The French Cleat Dilemma
You know, there’s something about woodworking that just gets in your bones. Maybe it’s the scent of sawdust mixing with the faint whiff of wood glue, or the sound of a table saw humming to life. It’s therapeutic, in a way, and even when things go south, I find myself smiling through the chaos. But let me tell you about this little escapade I had with a French cleat system—it’s a tale full of twists, turns, and a fair share of “what was I thinking?”
The Idea Blooms
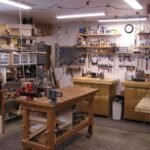
Last fall, I decided my garage needed a little more organization. You see, I have this love affair with tools—good ol’ power tools, hand tools, you name it. But with that love comes chaos. I had jigsaws and bandsaws archived in a way that would make a raccoon feel right at home. So, I decided to finally bite the bullet and create a proper storage solution.
I came across this magical concept called the French cleat system. I mean, it sounded fancy and all, and I could already picture those shelves gliding effortlessly across the wall, displaying my beloved tools like some kind of gallery. I’d seen a few videos and thought, “How hard could it be?” Spoiler alert: Pretty hard for a first-timer like me.
My First Cut
Armed with a cup of lukewarm coffee and my trusty circular saw—I swear that thing has seen better days—I headed into the garage. I picked up some decent plywood, the kind that smells like a fresh-cut forest, and set to work. I measured out the cleat pieces, trying to remember all those high school math lessons. I can still hear my teacher saying, “Measure twice, cut once.” Yeah, I should’ve listened. My first cut? A solid inch too short.
Ah, laughter became my coping mechanism that day. I was standing there, staring at the wood like it had just betrayed me, and I thought, “Is this how it always starts? One small mistake?” But hey, I gathered up my dignity and cut the next piece properly. It really is maddening how one little error spirals into an hour of backtracking, isn’t it?
A New Plan
So, after figuring out all my measurements for the cleats and getting them cut perfectly—thank you, coffee—I went to attach those bad boys on the wall. I had my level out, and you can bet I was channeling my inner carpenter at that point. I’m not going to lie; I felt like Bob Vila. But the wall? Not so much. You wouldn’t believe how wavy old drywall can be after years. Who knew?
I drilled and anchored the cleat into the wall, but the thing looked like a rollercoaster ride with all its ups and downs. I couldn’t help but groan, “Come on!” You’d think the walls were criticizing my handiwork. But stubbornness fuels my fire, so I pressed on. The next cleat went up a little better, but I made sure to double-check everything this time. Round two, same as the first: attach, measure, repeat.
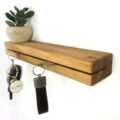
Hooking it All Together
Finally, the cleats were in place, and it was time to make the prize-winning shelves. I used some birch plywood, which smells delightful when you cut into it. It’s one of those things that makes you feel good about taking the plunge with woodworking. I crafted a few simple rectangular shelves and sanded them down nice and smooth. It’s like you can almost hear wood whispering, “You’re getting it right.”
But then, the moment of truth came. I attached the shelves to the cleats, holding my breath as I slid them into place. They fit! I almost jumped for joy. Almost. That’s when I thought about all the times I had tried to hang something and it just… didn’t. I was nearly convinced they would fall off, taking half my tools with them. But once everything was snug, and I stood back to admire my work, that little wave of pride washed over me. It was kind of beautiful.
The Glorious Chaos
Of course, like any good story, that wasn’t the end. As I went to grab my favorite drill to hang a few more items, I knocked over a can of stain. Oh, you can bet that stuff spilled everywhere—dropped like an artist gone rogue with a can of paint! I stared at the chaos, laughing and feeling just a smidge defeated. Between the tools, the sawdust, and now this—my garage resembled a disaster zone.
But let me tell you, each splatter told a story; it was history written in rust and wood grain. My French cleat system might not have come together without flaws, but isn’t that the magic of creating something with your own two hands?
A Final Word
When I look back at that project, I realize all the little trials and tribulations just added to the character of my workspace. I learned that woodworking isn’t just about perfection; it’s about the moments, the laughter, and sometimes even the messes. So if you’re thinking about trying a French cleat system, or any woodworking project for that matter, just go for it. Don’t be scared of a few mistakes; that’s where the real magic happens.
You’re going to mess up, but you’re also going to laugh, pivot, and create something uniquely yours. So grab your tools, and let the wood dust settle wherever it may. Happy building!