Coffee, Wood, and Lessons Learned
You know, there’s this special little place in my heart for intarsia woodworking. It’s one of those crafts that just pulls me in like a moth to a flame. So, grab a mug of your favorite brew, and let me tell you a story about how that passion turned into a wild adventure in my garage.
A few months back, I was scrolling through some woodworking videos online—because, you know, sometimes you just need to see what other folks are doing out there. I stumbled upon this awesome intarsia project; it was a beautiful rendition of a heron standing over a pond. I couldn’t get enough of the vivid colors and detailed patterns. The thought just hit me: “I could totally do that!" Now, mind you, I had dabbled in woodworking before, but this was a whole different animal. Intarsia takes patience and precision, which I often lack—more on that later.
The Wood
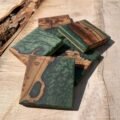
So, I headed down to our local lumber yard. I can still smell that familiar scent of freshly cut cedar and maple. As I walked through the aisles, tracing my fingers over the smooth grains, I felt like a kid in a candy store. I ended up picking up some beautiful walnut, cherry, and poplar. Honestly, the colors kind of called out to me, like, “Pick me, pick me!” The walnut had this deep, rich darkness, while the cherry was a lovely reddish hue that matched my childhood memories of sunsets over the lake.
When I got back home, you know what I did? I just laid out all the wood on my workbench and admired it for a good ten minutes. I mean, there’s something intoxicating about just looking at the wood. But then reality kicked in. It was time to start sketching out my pattern.
Sketching and Cutting
Now, this is where things started getting a bit tricky. I decided I wanted to make that heron, but I wanted to give it a bit of a twist—add more colors to the water, maybe play with the overall design. So, I got out my trusty pencil and paper and started sketching.
I almost gave up just trying to get the outline right. At one point, I was ready to throw the whole idea out the window because it didn’t look anything like a heron—more like a strange chicken, honestly. But something told me to take a breath and just keep going, so I did. I pulled back, took a sip of my coffee, and reminded myself that transformation takes time and patience—sure things might look wonky in the beginning.
When it finally clicked, I was so elated. I transferred the design onto my wood, and that’s when the real fun (and trouble) began.
The Cutting Process
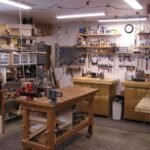
So, I set up my bandsaw—it’s an old Delta, but it does the job. The first cut felt magical. The blade hummed and buzzed, and wood shavings flew everywhere. I even caught a few light dustings of poplar shavings on my cheek, which was kind of funny. But soon, that thrill turned to frustration. I was cutting through the cherry when I heard this awful, grinding sound. My heart sank. I stopped the saw and checked it out. Turns out, I’d forgotten to change out the blade. Rookie mistake, right?
After a little bit of muttering under my breath (there may have been some creative swearing), I replaced the blade and went back to work. It felt like I was wrestling with a stubborn animal at that point. But when I finally got the pieces cut out—oh, the joy! Seeing the heron slowly come to life was worth all those moments of doubt.
Assembly and the Big Picture
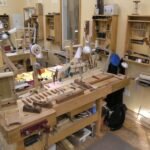
Now, here was where the real test came in. Assembling an intarsia piece is like putting together a jigsaw puzzle, but if you lose a piece, you’re kind of sunk. I laid everything out on my workbench again, just to see how it would come together. I even grabbed my jug of wood glue and set everything in place piece by piece, taking my time.
But can I tell you? I almost cried when I realized some pieces didn’t fit as I imagined. It felt frustrating. I had to sand down some edges, which was a perfect reminder that mistakes are just part of the process. That sweet scent of sawdust filled the air again, and I found humor in the struggle. If the piece could talk, I swear it would’ve said, “Hey, we’re a team here!”
The Finish Line
Finally, came the finishing touch—the stain. Oh, man, that’s when it all came together. I went with a natural polyurethane finish. The way it brought out the highs and lows of the grains, it was beautiful. I was nervous about ruining my hard work, but when I gave it a final buffing… I stood back, sipped my coffee, and smiled. It actually looked like something.
I remember my daughter stopped by to peek at my “chicken,” as she hilariously termed it. But when she understood that it was a heron and how many ups and downs it took to get to that point, I saw a twinkle in her eye. It felt good to share that moment, the struggle and triumph felt communal.
A Cozy Takeaway
If you’re thinking about diving into intarsia woodworking—or really any project that seems daunting—here’s what I’d say: just go for it. Don’t worry about the mess-ups. The failures are where the real stories come from. They shape us, sort of like how we shape that wood, you know? Every mistake carries a lesson, and every moment spent in the shop, whether it’s frustrating or joyful, is time well spent. So grab that wood, make a mess, and enjoy the journey—no matter how crooked the road might be.