The Beauty of 3D Modeling in Woodworking
You know, I’ve always loved working with my hands. Growing up in a small town, there wasn’t much to do on those lazy summer afternoons, so I’d hang out in my dad’s workshop, inhaling the smell of fresh-cut pine and whatever else he was working on at the time. It was like my own little paradise, the quiet hum of saws and the satisfying thud of wood hitting the table. Fast forward a few decades, and I found myself diving into this new world—3D modeling, specifically for woodworking.
Now, let me tell you, I am no tech whiz. I mean, I have my smartphone, sure, but I still struggle to set the Wi-Fi at home! So, when my buddy Frank told me about this thing called SketchUp, I felt a mix of excitement and, well, you could say a bit of dread. It sounded amazing—designing projects on a screen, getting everything just perfect before ever touching a piece of wood. But that learning curve? Woof. It made wrestling with stubborn plywood feel like child’s play.
The First Project: A Simple Coffee Table
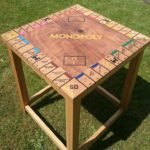
So, I decided to start small. I figured I’d design a coffee table for my living room. I mean, how complex could it really be? I fired up SketchUp, which still feels like a foreign language to me sometimes—so many buttons, layers, and dimensions. I spent the first two hours just trying to figure out how to draw a rectangle! Honestly, I was about to give up when I finally managed to create something that resembled a table. The feeling after finally assembling those virtual pieces? Pretty euphoric.
After hours of fiddling and cursing (I might’ve even thrown an empty soda can), I had my beautiful coffee table design glowing on the screen. I could see every detail: the finished dimensions, the joint types, and even where I’d be putting in those cute little wood dowels. The only thing left was to gather my materials.
A Trip to the Local Lumber Yard
Armed with my list, I headed to Al’s Lumber Yard—an old family-owned place filled with the rich scent of cedar and the comforting sound of wood sliding against wood. Al’s been around longer than most—it’s like stepping into a time capsule of independent craftsmanship. I grabbed some oak, a couple of sheets of plywood, and I swear, I could’ve spent an hour just chatting with Al about the differences between hard and softwoods. He always had the best stories.
With my wood loaded in the back of my truck, I had this rush of optimism. I mean, I had the plans, I had the wood, and I even had my dad’s old tools: a trusty miter saw, a jigsaw for the curves, and that roaring belt sander that could strip paint off a house. I had my soundtrack too—classic rock on the stereo as I rolled back home, windows down, smelling the fresh air mixed with sawdust-in-the-making.
The Missteps Begin
Then came the uh-ohs. Ahh, the uh-ohs. I’ll never forget when I cut the top of the table three inches shorter than my design. It was the kind of moment where you just stand there, dumbfounded, staring at that beautiful piece of oak with your mouth hanging open. This is where I almost threw in the towel. I mean, I worked so hard on that design! But the thought of not having a coffee table in my living room? Nah, that wouldn’t fly.
So, I took a breath, set the wood aside, grabbed a beer, and stared at that computer screen. I thought, “Alright, maybe I can adjust the design just a smidge.” It was a little humbling, really. Nothing beats the feeling of building something with your own two hands, but maybe that included a little flexibility.
Who’d Have Thought?
As I kept going, I found myself laughing a lot—not out of frustration this time, but because I was starting to get the hang of it. The joins were fitting a little better, the sander was smoothing out edges like a dream, and when I finally put on that finish, watch out! Nothing can compare to the thrill of seeing that wood grain pop.
When it was all said and done, that coffee table? Well, let’s just say it’s got a bit of a character. Sure, it’s got some quirks—an odd joint or two, a slight wobble that I like to think gives it charm—but it’s mine. It sits proudly in my living room, surrounded by family pictures and little knick-knacks that tell a story.
The Lessons I Learned
Now, here’s the thing: I’ve learned so much through my trial and error. Planning ahead with 3D modeling? It helps, sure. But just like my old man used to say, “Nothing beats the hands-on experience of making mistakes.” That moment of doubt, the barely-held-back frustration? It’s all part of the ride.
If you’re at all interested in giving woodworking a whirl, or even dipping your toes into digital design, just go for it. Make the mistakes, pick the wrong wood, laugh when something doesn’t fit. At the end of the day, it’s about the journey. I wish someone had shouted this at me as I poured over those 3D models: it’s okay to mess up. Embrace the flaws, the lessons. That’s what makes it real.
So grab a cup of coffee, fire up that saw, and don’t be afraid to learn through those missteps—I promise you’ll come out better for it.