The Woodworking Hat: A Pencil Holder Story
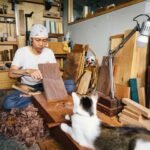
So, I sit here with my mug of black coffee—just the way I like it—and I’ve gotta tell you about this little woodworking project I dived into not too long ago. It’s a bit of a funny story, and yeah, it’s one of those projects that went sideways a couple of times before I finally got it right. But you know what? That’s the beauty of woodworking, isn’t it? You build, you fail, you learn, and if you’re lucky, you end up with something beautiful—or at least functional—at the end of it.
Now, I’ve always had this obsession with hats. You could say they’re my signature look, kind of like how you’d expect to see a local in a diner wearing a flannel shirt. So, I thought, why not combine a little practicality with my love for headwear? I could whip up a woodworking hat with a pencil holder integrated into the brim. I mean, who wouldn’t want to sport a unique hat while having their tools handy?
The Spark of an Idea
I was in my garage, surrounded by the sweet smell of cedar. You know that rich aroma? It always makes my hands itch for something to do. I had just taken a sip of my coffee when the idea struck me. I mean, what’s better than wearing a tool for your craft right on your head? Hats are pretty much the ultimate accessory, especially when you’re knee-deep in sawdust.
At first, I figured this was going to be straightforward. Just a piece of cedar for the brim, some fabric and thread for the hat itself, and a few tools scattered around. Easy, right? Well, let me just say that’s where things took a turn.
The Big Mistake
I started off with my trusty old band saw, which has been lifeline in projects like this. I got the piece of wood cut out for the brim and thought—oh yeah, I’m on a roll. But when it came time to carve out the pencil holder, that’s where I really messed up. I had this wild vision of a groove that was supposed to hold two or three pencils sharpened to perfection. But no matter how many times I measured, somehow my cuts never met up correctly.
After an hour of grinding and some not-so-great curses under my breath, I realized I had cut the groove way too deep. It felt like a scene out of a bad sitcom—watching me desperately try to fill in the mistakes while my mind raced through all my options. I even considered just tossing the whole thing into the fire pit. But something stopped me; maybe it was the smell of cedar, or the thought of letting my coffee go cold. Whatever it was, I paused and thought about it a little harder.
A Little Help
You know how we’ve all got that one friend who’s practically a wizard with tools? Mine is named Frank, and I called him up feeling like I didn’t want to admit defeat. He chuckled when I told him about the pencil holder a little too deep for comfort. “Why don’t you just put a couple of wooden dowels in it for support?” he suggested, half-laughing as if it was the most obvious thing in the world.
And you know what? Sometimes you just need someone else to look at your mess of a project with fresh eyes. I took his advice—filling the extra depth with dowels made all the difference. It was like Mary Poppins had waved her magic spoon around; suddenly the whole thing started to come together.
Things Get Real
After a few evenings of tinkering, I finally stitched the fabric to the wood casing, and I was feeling pretty proud. I still remember that moment—it was one of those rare times when everything actually went smoothly. As I cranked the sewing machine, the rhythmic whir mingled with the sound of my daughter’s laughter in the background. It turned into a weird heartwarming moment, combining threads and memories.
But then came the testing time. I wore it for the first time while hammering away on a separate project. Let’s just say, a pencil holder positioned at the front of your head isn’t as practical as it sounds. Several times, I found myself ducking to avoid low-hanging branches, and I might have knocked over a couple of paintings in the house as I rushed through the hallway. My wife just shook her head and laughed, “You look like a total goofball!"
The Joy of Imperfections
But somehow, through all the missteps and the creative gymnastics, I ended up with a hat that sparked joy every time I put it on. It’s got a charm all its own—the little nicks from the band saw, the thread that’s slightly off-center, but you know what? That’s a story in itself.
And that brings me to the warm, fuzzy part. Look, if you’re out there thinking about tackling a project that feels a little wild or uncertain—just do it. It might not come out perfect, or it might end up looking completely different than the vision you had in mind. But amidst all the mistakes, and maybe a few good laughs, you’ll end up with something that makes you smile.
So grab the tools, throw on a little music, and just go for it. Maybe you’ll end up with a funky hat that holds pencils—or maybe something even better. Either way, you’ll have your own little piece of art to show for it, and that’s what really counts.