The Joy and Chaos of Dog Tops Woodworking
So, there I was, sitting in my garage, surrounded by piles of timber, half-finished projects, and a couple of good ol’ tools that had seen better days. I’d just finished my latest woodworking endeavor, a fancy dog topper for my buddy’s business—yeah, the one that sells those “fancy pet treat to-go boxes.” Let me tell you, the whole process had its fair share of bumps. But like any good story, it brought its own laughs and lessons.
The Vision
This whole thing started with a conversation over coffee, of all things. My buddy Jake was lamenting about his dog treat shop and how boring it looked. “You should build me something that’ll catch the eye,” he said, his hazel eyes sparkling with excitement. “Something fun! A dog topper!” I’m thinking, alright, it’s just a simple wooden sign, right? But boy, was I wrong.
There’s a wide array of woods out there—cedar, pine, oak—but I thought I’d grab some birch since it’s well-priced and easy to work with. Plus, it has that lovely light color that might stand out on his storefront. I could almost smell that fresh-cut wood. You know that smell? Like a crisp morning, but… woodsy. That’s the sort of thing that usually gets my creative juices flowing.
The Tools of the Trade
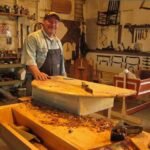
I rolled into my garage, tools scattered like puzzle pieces from too many projects. I’ve got my trusty miter saw, which, by the way, is worth its weight in gold. That thing practically sings when it cuts straight through wood, and I felt like a woodworking wizard every time I flicked it on. I laid the birch down on the workbench, my heart buzzing with a blend of excitement and nerves.
One mistake I made right from the get-go? I didn’t sketch it out first. Now, if you know me, you’ll know I should’ve learned by now to at least draft a quick little design on a napkin or something. But nope, I just dove right in, cutting pieces before really seeing how they’d all fit together. And let me tell you, folks—there’s nothing like standing there, head tilted, wondering why half of what you’ve just cut resembles a jigsaw puzzle meant for kindergartners.
The Big Oops
Somewhere between screwing in the legs and attaching the top, I had a complete brain freeze. I mean, I almost gave up when I realized I’d put the top on backwards. I stood there staring, dumbfounded. The drilled holes were wrong, the grain of the wood was facing the wrong way, and every bit of my confidence went poof. But then I remembered my dad—it’s like he was right there beside me, cradling a cup of coffee in one hand and laughing at my goof.
“Even Picasso made mistakes,” he used to say. Well, maybe I wasn’t Picasso, but I swallowed those doubts and decided to just flip it around, patch it up. I tracked down some wood filler—thankfully, I always keep a little on hand. It’s the secret sauce for all those imperfections. Smoothed it out, sanded it like an old-timey carpenter, and then boom, I was back on track!
The Moment of Truth
I won’t lie; nerves hit me when it came time to stain it. I chose a rich walnut finish because I thought it’d give that warm, inviting vibe outside Jake’s shop. But oh, my goodness, staining was a workout! As I rubbed that cloth over the wood, I could hear the rhythmic sound of the radio softly playing country tunes in the background, mixing with the smell of the stain—kind of like a cozy Saturday morning. And then… the dreaded moment. Stains can be fickle, trust me. I took a deep breath and hoped for the best.
When I pulled that cloth away, the color looked flawless—it was like uncovering a treasure. As darkness fell and the garage lights flickered on, I stepped back and admired my handiwork. I laughed when it actually worked! It was a real “yeah, I did that!” moment. But as I stepped closer, I realized the legs weren’t quite even. Ugh! More fixing!
Almost There
With some shimming and a little elbow grease, I prevailed. I loaded it onto my truck, heart racing. Driving over to Jake’s, I felt like a kid on Christmas morning, but also like a nervous schoolboy with a big crush. What if he didn’t like it? What if I’d completely missed the mark? I mean, I put my heart into this thing, and now it was going to be out there for the world to see.
When he opened the door, the look on his face was priceless. I mean, he practically glowed! “You did this?” he exclaimed, running a hand over the polished wood. I mentioned the mishaps, and we both chuckled together, sharing some beers while I watched kids run around his shop, dogs sniffing at the new dog topper, tail wagging like they knew something special was happening.
The Takeaway
So there you have it. A whirlwind of wood shavings, laughter, and a few over-caffeinated nights later, that dog topper became a part of the little town we call home. It serves as a reminder—when you make something with your own hands, imperfections and all, it carries a piece of your heart in its grain.
If you’re even thinking about trying something like this, just go for it! Mistakes will happen, sure. But that’s just part of the magic. Grab that piece of wood, take a chance, and who knows? You might just end up creating something that brings a smile to someone’s face. And really, isn’t that what it’s all about?