Bowtie Jigs: A Tale of Wood, Wonder, and Woodworking Woes
You know how it is when you sit down with that first cup of coffee in the morning—maybe the sun is peeking through the trees, and the smell of that rich brew is wafting through the air? For me, it’s the perfect time to think about the latest project I’ve been wrestling with in my little workshop out back. So, grab a mug, and let me tell you about my adventures (and misadventures) with bowtie jigs.
It all started a few months back when I decided I wanted to take on a bigger project than usual. I stumbled upon these beautiful bowtie inlays while scrolling through some woodworking forums. They looked like they belonged in high-end furniture stores, and I thought, “Heck, if I can pull this off, maybe I could gift a couple of them to friends or sell one at the farmer’s market.” You know, something to put a little more “wow” in my work.
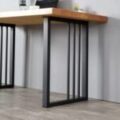
But, Lord—this was not easy. It turns out, making those delicate bowtie joints—those cute little things—was a bit more complex than slapping some wood together to make a shelf. I can still hear the sound of my table saw buzzing and the scent of freshly cut cherry wood lingering around me. I bought a bunch of cherry, and I couldn’t help but admire the grain. It felt almost mystical.
The First Flub
So there I was, full of bravado, convinced that I was about to create something that would go down in woodworking history. I had my bowtie jig set up, which I built from some scrap plywood. Honestly, I was pretty proud of how it turned out. It had these nice, clean lines, and I felt like Bob Ross for a moment, envisioning little happy trees in my head. But things took a turn when I started cutting.
You see, I didn’t quite grasp the importance of depth, and my first attempt went right through the wood like a hot knife through butter—except it was more like a butcher knife through a block of cheese, and I ended up with a huge hole where my pretty bowtie should have been. I almost gave up then and there. I mean, who wants to waste all that cherry? I nearly threw my hands up in the air like some kind of frustrated cartoon character.
The Second Try: Learning Curve Awaits
But I sat back and reminded myself that patience is key. I grabbed some of that cheap pine I always have lying around and decided to practice a bit more. The smell was different—not quite the sweet aroma of cherry but more like a blank canvas waiting to be painted. As I worked through the adjustments, I learned quickly about the importance of clamping down the wood properly. I could hear the wood creak, and for a moment, I thought it might snap under pressure—like it had a mind of its own or something.
When I finally managed to cut the bowtie shape correctly, and it actually fit snugly into the slot I had made, I laughed out loud, sitting there in my dusty garage with my safety goggles perched on my head like some kind of goofy crown. The sound of victory was sweet—like the sound of a good, hearty laugh between friends.
Progress and Pain
Next up, I decided it was high time to try out the whole gluing and finishing process. This was where the real magic happens, folks. I used Titebond III, which I always have on hand. That stuff is like liquid gold in woodworking, trust me. I applied it generously, trying to keep things clean—though, let’s be honest, my hands ended up looking like they had been dipped in a bucket of glue.
As I pressed the wood together, I could hear the squish and feel the warmth as I clamped it down. The whole garage smelled like new beginnings, mixed with a slight tang from the wood glue. Waiting for the glue to dry was like watching grass grow, and I’ll admit I may have peered under the clamps more than once, hoping to speed up the countdown in my head.
Finding Your Way
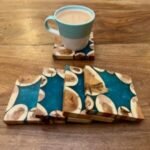
By the time I sanded everything down, I was downright giddy. The grain of the cherry wood popped in a way I’d never seen before, and the bowtie inlay was finally looking like something I’d want to show off. All those moments of doubt? They melted away as I rubbed my hands over the smooth finish, admiring what I had created.
I think what I learned the most through this process is patience and persistence. It’s easy to feel defeated when things don’t work out the first time—or the second or twelfth time, for that matter. I chuckled to myself, remembering how I almost let that first failure throw me off entirely. And maybe you’ve been there, too, struggling with a project that feels like it’s just not meant to be.
A Warm Reflection
At the end of the day, if you’re thinking about trying out a bowtie jig, just go for it. Don’t let the fear of failing stop you from diving in. Each mistake is a step toward making something beautiful. Honestly, those little frustrations were all just pieces of the puzzle, and each time I figured something new out, my heart felt a little fuller.
So here’s to you, the fellow woodworker, or wannabe woodworker. May your sawdust settle lightly on the floor, and your creations bring you as much joy as you give others. Happy woodworking!